

What is mutation testing? How can we generate test cases “for free”? How to make our software tests bulletproof, so we can refactor the code with more confidence?
At Yumasoft, we believe that testing is an inseparable part of software development. Mutation testing, which recently got a bit more attention in programming communities, is a great way of improving our tests. In today’s article, we’re exploring what mutation testing is and why everyone should be using it ?
Table of Contents
What is mutation testing?
To make it clear, mutation testing isn’t just a new type of tests you can write. At least not in a casual sense of a test ?
Mutation testing is a technique for validating your already-existing tests. They basically allow to test our tests.
Mutation tests are not for people who don’t write tests (go away, we don’t like you!). They are for people who care about testing and want to make their tests better.
How does mutation testing work?
Mutation tests introduce mutations into our source code under tests (you can call it production code). Mutations can be any changes in the source code you can think of. Let it be a modification of a condition within an if statement, replacement of a string value or change of an arithmetic operator – you name it. All you need to know is that mutation testing is based on automatically introducing changes to your source code.
Our codebase with such a change (a single one) introduced is called a mutant. It makes sense – our production code is now somehow mutated.
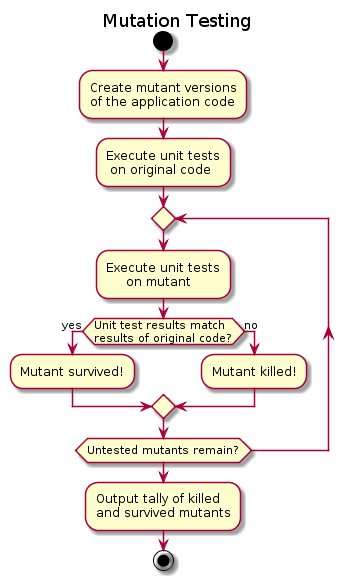
What happens with such a mutant then? All our existing tests are executed against it. Such tests’ execution may produce two outcomes:
- all tests have passed – that’s a bad scenario. It means that our mutant has survived. In other words, it means that a modification of our production source code wasn’t detected by our tests suite
- at least one test has failed – that’s a good scenario. It means that our mutant has been killed. This is what we want, because it means our tests are well-covering and detect changes in the production code.
You can see the flow of mutation testing on the following schema:
Example of mutation tests
To make mutation tests more practical, let’s see an example. We’ll be using StrykerJS for production code written in TypeScript.
This is our production code:
We have of course written some tests for this code. When we execute these tests with jest, we can see the following result:
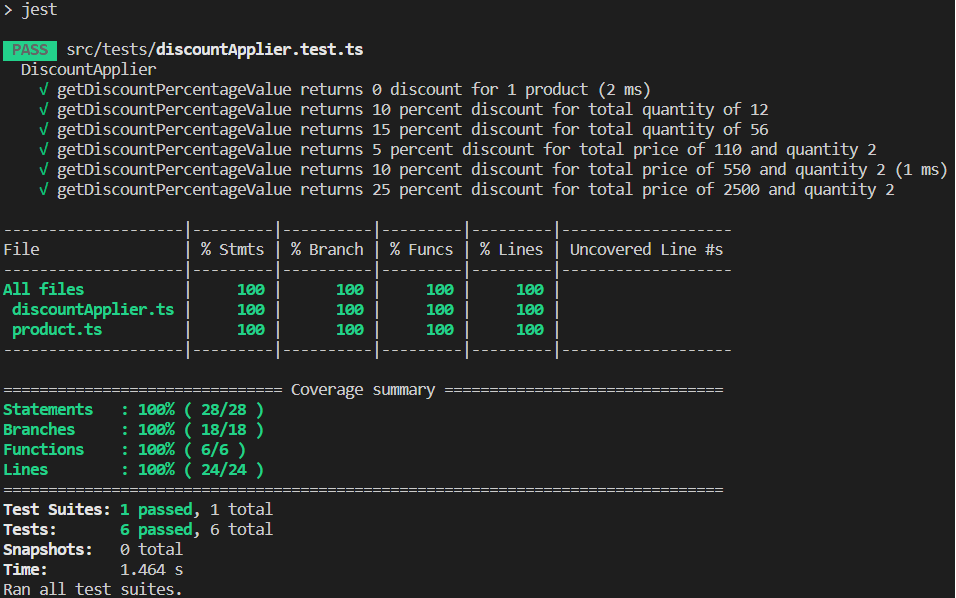
So we have 100% coverage for DiscountApplier class! What’s more, we have 100% statements, branch, functions and line coverage! This sounds perfect, right? Why should we bother more? ?
Let’s deep dive and run StrykerJS mutator against our app. After installing and configuring Stryker properly, we can execute npx stryker run command. That’s the final result:

Whoooaa… we see here some 82.14% value, not 100% anymore ? This is what I call mutant coverage.
Remember what we said above about survived and killed mutants? Pay attention to our mutations results above – we have 46 mutants killed, but 10 of them survived. It means that we have a potential to add more tests to cover these scenarios.
We will not be going through each mutant and adding the test for it in this article, but I can tell you what these results can give you. In the beginning, when our mutant coverage was 82.14% with 10 mutants survived, we had 6 unit tests written for DiscountApplier class. In the end, after working out and killing each mutant one-by-one, we finished with 12 unit tests and 100% mutant coverage.
In 10 minutes (time needed to add these 6 tests), I got twice as many unit tests as in the beginning. Now, both “traditional” and mutant coverages are 100%. My confidence in refactoring or modifying the production code is much higher now. Notice that we got this all “for free”. Mutation testing tool (StrykerJS in that case) did everything for us. This is huge! ?
How to start writing mutation tests
Just find a proper mutation testing tool for the framework/programming language you work with. Here are a few most popular examples:
- JavaScript/TypeScript/C#/Scala: Stryker mutator
- Ruby: mutant
- Java: Pitest
- PHP: Infection
Go straight to the docs of your tool of choice and start mutating ? The messages about each mutant are very clear, so adding new tests to kill them will be very easy. It’s like someone sitting next to you and telling you exactly what test you should add for your code. That’s actually a pretty decent solution for anyone who doesn’t like writing tests ?
I don’t see any reason why anyone would not use mutation testing. It’s such a great tooling that I don’t see any disadvantages in using it. It can greatly help you with TDD as well as an additional “layer” of inventing new test cases and patching your code. Believe me, you’ll see the benefits straightaway.
So – download one of the mutation tools and make your tests bulletproof today ? Or at least see how bad they are now ?
![webpack code showing [cached] everywhere](https://blog.yumasoft.pl/wp-content/uploads/2021/11/Yumasoft_webpack_watch_cached_not_refreshing_bundles-1-263x174.png)